INSTRUCTIONS
if you prefer acrobat platypuscare.pdf
After assembly and between grafts keep the instrument
immersed in water. If only sterile saline
is available, be sure to wash the bearings with water before
sterilisation.
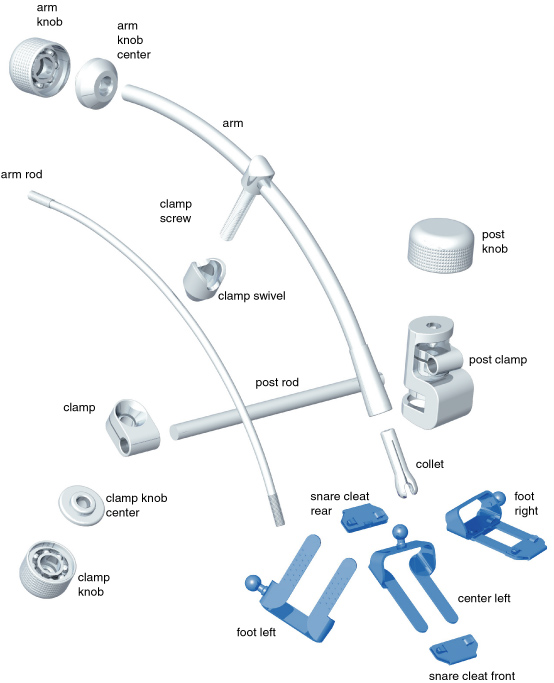
Screw
the collet onto the arm rod; use a quarter of the available thread.
Insert the arm rod, into the wide end of the arm, exposing thread
at the other end.
Slip the eye of the clamp screw onto the arm and assemble the rest
of the arm clamp, as shown on parts diagram.
Assemble the arm knob and engage a few turns of the arm rod thread
.
Push the arm knob into arm and hold it on a hard surface so that
the desired foot can be snapped into the collet. (Expose more collet if
it doesn't engage. )
Push the snare cleats onto the foot. ( The one with the lug goes
under the arch. ) It may be necessary to adjust the tightness of the
cleats on the foot by closing the cleat fold with a large needle
holder.
Assess the appropriate orientation of the foot and tighten the arm
knob 'till the foot is held firmly, but still adjustable. ( Since the
collet allows acute angulation in only one plane make sure it is
pre-set appropriately prior to tightening. )
Put a few turns on the post knob, push the post rod into the post
clamp and clamp post and rod simultaneously in the desired position on
the chest spreader.
Slip the arm clamp onto the rod and press the foot onto the artery
while your assistant tightens the arm clamp.
Make final adjustments to the foot and fully tighten the arm knob.
At the conclusion of the anastomosis push the rear snare cleat off
with a "Roberts" clamped onto the lug provided.
Hold the heart while your assistant loosens the clamp, then lift
the foot clear of anastomosis.
Put stabiliser back in a bowl of water.
(or right click in
this frame and choose print only this frame. Otherwise click in this
frame and choose from the menu "file" print frame)